Sunday, July 24, 2011

Anniversary Card and Some New Bookmarks

I think I have mentioned this anniversary card at least a couple of times.  We have some very good friends, M and E.  Waaaayyyy back in the olden days, aka the 90s, we bought our first houses down the street from each other when we were all pretty much newlyweds.  They were expecting the first of their three sons (who just turned SIXTEEN, OMG!) at the time, and we became fast friends.  My son is right in between their older two boys age-wise- D, their oldest is 16, Josh is 15, and J, their middle son, is 14.  They also have an 11 year old.  Three boys...they are a busy family!  Anyway, they are wonderful friends.  D and J are Josh's best friends, and have been since basically birth.  It is so neat to have seen these guys grow up together and maintain the bonds that they established at such young ages!  We really cherish our friendships with this family.  They are amongst the people who we know 100% we can count on, and we are, I hope, the same to them.  We have seen each other through some rough times, as well as shared the good times over the years.  So it is with much joy and happiness that we share their 20th wedding anniversary with them!  They are having a party (adults only, woo hoo!) this coming Friday night.  Which immediately precedes our vacation to Montana- we leave on Saturday- so I am glad that we will be able to celebrate with them!

So, I wanted to make them a card.  I have really struggled with it for some reason.  Not sure why- I just couldn't find any inspiration.  Usually, I have some idea or concept that I start with, and it kind of puts itself together from there.  It can start with something I know about the recipient, or I might get my inspiration from a paper, color, flower, etc.  For this one, I had the idea of putting a picture of the two of them on the card, but that was where I ran out of ideas.  It was easy enough to swipe a picture of them off of one of their Facebook pages.  But the rest of the design?  I kept coming up blank.  Two weeks I have been turning this over and over in my mind, and counting the days as I was running out of time.  Today was the last day I had to work on this, since I really can't count on having time for crafting during the week.  The pressure was on!

I knew I wanted the photo in black and white, so that dictated a somewhat simple color scheme.  Their home is just lovely- I wish I had E's flair for decorating!  They have a lot of neutrals in their house, so I didn't want anything too bright and flashy.  Something simple, classic, with clean lines.  They have some furniture I just love, a sofa and loveseat, in a deep, rich eggplant purple.  I thought that would be too dark, so I stayed with the purple idea and chose a lighter shade of dusky lavendar.  It goes well with black and white and gives just enough of a hint of color to make it interesting.  That decided, I moved on to the other elements of the card.  I wanted to put a sentiment on the front, but I wasn't sure what.  For some weird reason, out of nowhere, I conjured up a quote from the Beatles, "in the end, the love you take is equal to the love you make".  Except I was thinking it was John Lennon, and I wasn't sure of the exact wording, so I Googled it.  Found out it was the Beatles, and decided that that wasn't necessarily the message I wanted on the front of the card, but now I had a direction to go in.  I Googled John Lennon quotes, and found one I liked..  I also pulled from somewhere in my subconscious "live, laugh, love" which honestly, I think, really describes my friends, and wanted to incorporate that somehow.  So I had all these fragments of ideas that I needed to put together.  Here is what I came up with:


I embossed the dusky lavendar background with a Cuttlebug embossing folder.  The torn corners came from an idea in that card-making book I'm always talking about- I thought it was kind of cool, and softens the look a little bit, with all of the rest of the lines being so straight and clean.  I used small silver brads in the corners of the sentiment box, which just gives it, I don't know, something extra.  The sentiments are all framed in black, and the inside is relatively simple.  I like it- I hope they do too!  They have the funnest party EVER planned (is "funnest" a word?  My kids say not.)  They want the ladies to come wearing a bridesmaid dress, and the guys to show up in a suit jacket.  Not a suit, just a jacket- so anything goes for underneath!  Sometime this week after work, I need to make a stop at Goodwill and see what they have in the dress section....I'm envisioning something pastel, frilly and fluffy- the most God-awful obnoxious bridesmaid dress ever!  And I think my husband needs to wear his very formal pin-striped navy blue suit jacket with cargo shorts.  Won't that be an..interesting..look??!


In addition to the card, I did a few bookmarks today.  This is in preparation for expanding my idea of the gift envelopes and matching cards- I wanted a few new designs to work with.
This one uses a forest green hand-made paper, and a neat leaf-patterned paper, along with the daisy.  I like the fresh, clean colors.

This one incorporates a classic color combo, brown and pink.  I picked up this patterned paper at Michael's a few weeks ago, and it coordinated perfectly with the pink larkspur.

This is some Japanese washi paper that I got this week at the office supply store downtown.  I love the contrasting pink and green.

And this is one of the patterned papers I picked up at JoAnn's that first weekend that Meredith and I went to the new store and went nuts.  Also used a pink larkspur here, though I wish I had a darker pink flower to use instead.


We are heading to Montana in a few days for our summer vacation- up to see my cousin Trina and her hubby, with whom we always have a great time!  I am looking forward to some quiet, tranquil time to unplug and just hang out, read books, go fishing, and not think about work!  See you after vacation!

Sunday, July 17, 2011

Another Bookmark Gift Pack

I am really liking this gift pack idea, and have been looking forward to trying a few more designs.  This week, I decided to do one with a pressed flower bookmark, and I actually have a good excuse!  I've been very busy at work on a big project for one of the cities that we work with.  The project manager at the city is a lovely woman who I have enjoyed working with, but she is leaving the city to pursue other interests and go back to school.  Her last day is in a couple of weeks, and I wanted to make her a card to express my best wishes for her future plans.  So, I figured, why not give her a bookmark as well?  It might come in handy when she starts school!  I chose one of the one-flower bookmarks I had previously made as the starting point:
I love the contrasting purple and green shades in this one!  First up, I made a card:
I got this butterfly stamp during the big 4th of July sale at Craft Warehouse, and it came also with the "Take Wing" sentiment.  I thought it was very appropriate for wishing someone well on future endeavors!  The card base is green, followed by a deep plum layer, then the same striped pattern paper that was used in the bookmark.  The butterfly and message were stamped onto white card stock with deep purple pigment ink and heat embossed.

Here is a close-up of the butterfly:
I colored in the white spots with two shades of green watercolor pencil and blended the color with a paper towel with a bit of water on it.  In hindsight, I wish I had used just the light green, because the darker green I used around the edges has just a bit too much blue in it to go with the rest of the colors in this card.  Oh well, live and learn!

Here's the inside of the card:


Pretty simple- a fuschia layer, followed by the white layer, which I used a corner punch on the corners, and the "Best Wishes" stamped in purple.  I punched a butterfly with a MS punch out of the same striped pattern paper and glued it on the bottom.

The gift envelope for the bookmark:
Sorry the lighting is kind of bad on this pic- the purple is not quite so blue in reality!  I used that same corner punch on the corners.  The seal is similar to the one I did on the previous gift envelope, except I added the butterfly punched from the striped paper.

And here it all is together:


I lined the inside of this envelope with green, with the corners punched with the same lace corner punch.  I like how it turned out!  These are some of my favorite colors, and this bookmark is one of my favorite one-flower bookmarks, so I am pleased with the results.  I hope the recipient of my gift and card like them!

I have several other things in the works, or at least in the planning stages.  I still have the Christmas cards for the Christmas in July swap on the back burner, because sign-ups for the swap go through the end of the month.  I don't have to mail them until the end of August, so I have plenty of time for that.  I am also in the process of figuring out a design for an anniversary card for some very good friends of ours, who just had their 20th anniversary.  They will be having a party in a couple of weeks, so I want to make a card for them.  I also have a friend whose birthday is coming up, and I was thinking of surprising her with a photo bookmark with pictures of her kids on it.  She has two daughters, a step-daughter and step-son, so this would be a double-sided bookmark.  She has lots of pics on Facebook, so if I can find some good ones to copy from there, I'm in business!  All of that should keep me busy for awhile!

Sunday, July 10, 2011

An Idea I'm Working On

Howdy!  So nice that it is summer, the kids are out of school and most activities, and I have more time to craft!  I've had this idea floating around in my head for awhile, and I finally started experimenting to see how it would actually work.  I haven't been doing much in the way of bookmarks lately, in favor of developing my card-making skills, but I've wanted to figure out a way to incorporate them both.  At first I thought about doing a card that has a bookmark attached, and I might explore that idea at some point, but for now, I'm pursuing another idea: a bookmark and card gift pack.  I designed a simple gift envelope for a bookmark (still tweaking the dimensions and basic design) and a card, all of which have matching designs.  My initial experiment is with a very simple patterned bookmark, no pressed flowers, but in the future I will see about doing something with the flower bookmarks as well.  Here is what I came up with:
Here's the card.  I have had this cute paper for awhile, creme with a black floral pattern.  The card base is black, then has a layer of a light beige crinkle-textured paper (love that stuff!  I got it at Target a year and a half ago, and can't find it anywhere now).  Then the patterned paper is framed in black as well.  I stamped the messages on pieces of creme paper in black, and embossed them.  These are also framed in black.  I punched the flower out with a 1" flower punch in two layers, and used the rounded end of a paintbrush to sort of curl the petals in the center.  The leaf is punched in black with a MS leaf punch and glued to the card.  The flower is attached with a small black brad.  I have never used brads before, but I like it- now I would like to get a few different sizes to try on other things.
This is the inside of the card, stamped in black, not embossed.  I need to work on not stamping crooked!
This is the back side of the gift envelope.  I made this using my MS scoring board, then glued strips of paper on in coordinating colors/patterns to the card.
The front of the envelope.  The seal was punched out in black using a 1.5 inch scalloped circle punch, and layered with a 1" circle punched out of the floral pattern paper.  A strip of the patterned paper was adhered to the edge of the envelope flap.  I put temporary adhesive on the part of the seal that sticks to the envelope, so that it is easily opened and can restick.
And here is the bookmark.  As I said, simple design, black border with the floral pattern paper, laminated, and topped with a black ribbon.  I tied the ribbon in a bow to place it in the envelope, so that it would not hang out.  The bookmark is adhered to the inside of the envelope with temporary adhesive, so it is easily removed.
And here is the whole gift package together!

I had a lot of fun putting this together, and am already dreaming up new designs!  I would like to work on the structure of the envelope- maybe round the flap or soemething along those lines.  I've also played with the idea of using velcro for the enclosure, but not sure I would want to bump up the production costs for that.  Next I will be playing with designs that use the pressed flower bookmarks.  I have yet to find a good way to make a card with pressed flowers that keeps the flower protected, so I'm thinking I will use the one-flower bookmarks that use patterned paper, so that I can use the same paper on the card and envelope.

Here is another card I did last weekend.  We went to some friends' house for the 4th of July, and she had just gotten back from CA where she went for her step-father's funeral.  I had seen a sympathy card design that I liked in my book, so used that as a guide on the design.  My colors and stamps were not exactly as the one in the book, and it didn't come out as nice as the one in the book, but my friend seemed to like it:

 I did not have a sympathy stamp, so I hand-wrote the sentiment on this one in silver gel pen.  I used a crinkle technique from my book on the creme paper base- very easy!  Just spray the paper slightly with water, then wad up into a ball, flatten, and dry.  I used a dry iron on a dish towel over the paper to flatten and speed up the drying.  I then stamped it with a leaf stamp using a mossy green ink.  The striped square is made with an orange paper that I mottled with a goldish yellow ink, then stamped in with white ink with a stripe stamp.  The card in the book used a pinstripe stamp, which I could not find, so this worked as a substitute.  Anyway, it's not the best card I've ever made, but it worked.


That's it for this week!  I was going to get started on my Christmas cards for the Christmas in July swap, but decided not to just yet, since sign-ups go through the end of the month, so I'd rather wait until I know how many I need to make.  I do have all the supplies for them- although if I have to make more than 4 of them, I might have to go back to JoAnn's and get more of one of the papers.

I have a new project on the horizon, and that is an anniversary card for some very dear friends of ours who are having their 20th anniversary this week.  They are going to be throwing themselves an anniversary party in a couple of weeks, so this is a chance for me to try a card I have not done before- it is challenging, but fun, to do something other than birthday cards!

Sunday, July 3, 2011

A Birthday Card

It has actually been a pretty busy week craft-wise, but I don't have much to show for it at this time.  It's a holiday weekend- the 4th of July is tomorrow- so there are sales everywhere!  I have hit the sales at a few different stores, and have been very excited about the deals I've gotten!  First, Craft Warehouse sent out some email coupons, 40% off one item for Friday and Saturday, 50% off one item for Sunday and Monday.  I have managed to get over there every day so far to take advantage of the sales and coupons.  For one thing, all of their stamps are 40% off - no coupon needed!  I've gotten a few that I am excited about.  I also got a Scotch brand tape gun which I am really liking so far!  I have been using up a lot of those smaller craft adhesive cartridges and after talking to one of the sales ladies at CW, I was persuaded to get the Scotch one.  It is pretty nice- I am still getting the hang of it, but it will pay for itself pretty quicky, since the refills cost less than the other ones overall.

I have been working on a couple of different things- one is a Christmas card for the Christmas in July swap for the PBS Swappers group.  Sign-ups are still going on, so I don't know how many I need to make yet, but I wanted to figure out a design.  I had an idea in mind that was based on something I saw in the book I mentioned in my last posting....but you know how sometimes you get an idea in your head, but no matter what you do, you can't seem to make it come out the way you envisioned it?  Yeah, that's what happened there.  So, I had to move on to Plan B.  Fortunately, as I mentioned before, I had done some shopping.  My daughter Meredith and I went to Craft Warehouse on Saturday, and followed that up wiih a trip to the brand new JoAnn's, which moved from another location- and oh, what a beautiful store!!  Their paper crafting section is at least twice the size of their old store, and EVERYTHING was on sale!  I got lots of paper, a leaf stamp set, a snowflake Sizzlits die, and several other items that I probably would not have paid full price for, but at 40% off, who could resist?  One of the papers I got was a Christmas holly paper, and that is what I used to design my Christmas card.  I am pretty happy with the results, and will post a pic when I finalize the design.  I am happy with what I have done so far, but still have to finalize a couple of details before I can consider it "done".

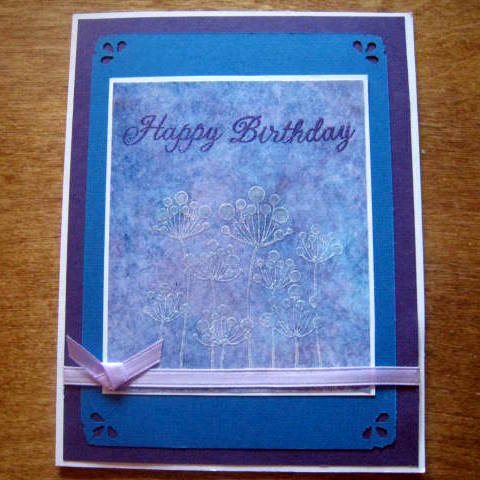
In the meantime, I realized that my husband's neice Monica will be 13 in the next week- how did that happen already?!  I remember visiting just after she was born, a chicken lasagna in hand for her parents, and it seems like just last week!  Oh how time flies anymore!  Anyway, I wanted to make a card to send her.  I found a really cool paper at JoAnn's yesterday that was very similar in its look to the mottled look I did in my last card with stamp ink- only this would save me a lot of work (and ink) since the paper already has the design on it.  I wanted to try something similar to that last card, but with a different technique.  On this one, I stamped the flower design in white pigment ink, then embossed it with a sparkly embossing powder.  The result is kind of a translucent but sparkly, iridescent finish.

So, here is what I did here: the card is a white card base, to which I attached a purple card front, then a turquoise piece that I punched with a corner punch for interest.  Then I stamped the patterned paper with the flower stamp and White Frost pigment ink and embossed with a sparkly iridescent embossing powder.  I stamped the Happy Birthday message in purple, and embossed with the same embossing powder.  I then added the lavendar ribbon.

I also embellished the inside of the card:
This was fun- I used a border punch for the sides, and the same corner punch that was used on the front, on a piece of light purple pastel card stock, and put it over the white inside of the card.  Then I added a white piece of card stock that I had punched out the corners with the same corner punch, and stamped the sentiment with purple pigment stamp ink.

I really like this.  I had been thinking since I made the cards for the June PBS Swappers swap about an alternate method of doing the silhouette in white against a mottled background, and am glad to have found something that works.  It was also fun to experiment with the sparkly embossing powder.  One of these days, I will be brave and try a colored embossing powder, like my daughter is itching to do!

I have lots of new things to try in the near future- amongst my new acquisitions is a set of watercolor paints, so there is a technique with those I want to try soon.  I also have plenty of stamps to play with, so look forward to that.  If only I had more time to do crafting!  Well, it is a 3 day weekend, and I have much of tomorrow that I can use for experimenting.  I am having a lot of fun, that is for sure!  I'll be sure to post pictures next time!

Sunday, June 26, 2011

I'm Back (Finally!)

Hellooo!  I did not actually drop off the face of the planet- I just dropped off of the blogosphere temporarily.  The last couple of months have been crazy busy- end of the school year and all of that.  I also went through sort of a creative slump...couldn't find any inspiration, and even when I had projects to do, I struggled with them.  I did a card swap for the PBS Swappers for masculine cards, and it was NOT my best work.  I did take pictures, but I'm not sure I want to post them here!  I might later, but they're on my husband's camera, which is currently in Utah with him and the kids.  So maybe someday!

While I was off being uninspired, I thought maybe I could use some help with ideas, so I browsed through some  books at Michaels, and finally decided to purchase one.  Treasuary of Tips and Tricks by Paper Crafts & Stamp It! has over 650 projects and ideas in it, according to the little snippet on the front cover.  I have barely made a dent in looking at all the stuff in there, but wow, there really are a lot of neat things!  Did you know that you can make scented cards by adding Kool-Aid mix to your embossing powder??  Neither did I!!  But I do now!  Anyway, I think being able to browse through some of these ideas helped kick-start my creative juices again, and now my brain is overflowing with ideas!  Ah, if only I had more time.  Well, at least I have some direction now.  I've branched out into experimenting with stamping and heat embossing, and that has been fun!  I had a little mishap with my first heat embossing tool when I first started out, though.  I bought it a few months ago at Craft Warehouse, but had not had a chance to try it out.  I got a new stamp that I wanted to experiment with, so I stamped my paper, sprinkled on the embossing powder, and turned on my brand new, just out of the box heat tool.  I held it over my stamped image, and just as the embossing powder started to melt.....the tool made a clicking sound and seized up.  I used it for all of 15 seconds, and it burned itself out.  Fortunately, the folks at CW are very nice people, and even though I had NO idea where the receipt would be, they let me exchange it for another one.  I finally got to use it this weekend, and I am happy to report that it worked just fine!

So here is what I did with it.  This is for another card swap for the PBS Swappers group- for basically any type of card.  I always seem to do birthday cards, so I wanted to do something different this time.  I picked up a package of stamps for pretty cheap at Michaels, one of which is a "Best Wishes" stamp, and decided to use that one.  I also found this really neat wildflower stamp, and thought it would be perfect for what I had in mind.  I had seen a sample card at Michaels awhile back that I really liked- it had puffy white dandilions silhouetted in white against a mottled blue background.  So that is what I used for my inspiration.  Here is the result:

I used watermark pigment ink to stamp the image onto white card stock, then heat embossed it with clear embossing powder.  I then dabbed on two colors of stamp ink with a sponge dabber to create the mottled blue and green background color, then just wiped the ink off of the embossed image with a paper towel while it was still wet, to keep it white.  Then I added the Best Wishes sentiment with the stamp, using the same blue ink that I used for the background.  I added the dragonfly as an afterthought, but I really like it!  I had been experimenting with dabbing the ink onto vellum, so had this piece of scrap vellum with the blue and green ink on it.  I punched the dragonfly out of that with a MS dragonfly punch, then dabbed on some silver pigment ink over the blue/green that was already there. I made the flower using various flower punches and used a white pearl for the center.  I am really happy with how it came out! Here are some close-ups:


And here are all of the finished cards.


And OH!  I just rememered that I never shared about my new crafting space!  Ever since I started crafting, I've had to use the kitchen table.  My supplies were stored in various places around the house, whereever I could fit them, and it was pretty inconvenient whenever I wanted to craft, since I had to haul my stuff in from other rooms.  I dreamed of a crafting room all to myself, but when you have 2 kids in a 3 bedroom house, it is just not to be.  However, we had a playroom for the kids.  The kids are not little anymore though- my son will be 15 this coming week, and my daughter will be 11 in September, so they really didn't have much need for a room full of toys that they never played with anymore.  My husband was given a mini pool table by a friend, and as he's always wanted a pool table, I agreed to it on one condition: that it does not take up an entire room all by itself, just to play pool.  I wanted to find a way to use it for multiple purposes.  So my clever husband built a tabletop for it.  It is the perfect surface and height for my crafting!  Plus, he found a removable net that can be put on it to play ping-pong- how cool is that?!  The kids are thrilled with their new game room, and I am thrilled with a place to keep all my crafting stuff in one place, as well as be able to spread out and work on my projects.  Here is the finished room:


Some of my storage space:

We're still doing some organizing in there, so hopefully someday I will be able to have entire shelves to myself and not have to share with ping-pong paddles and the like!  I have only done two projects in here since it was done, and it was soooo wonderful to be able to have everything at my fingertips!

Well, that's all for now!  I just joined another card swap for next month, Christmas in July, so get to start thinking about holiday-themed cards next!  I already have a few ideas, so am looking forward to playing with them a bit.  See you next time!

Tuesday, May 3, 2011

Slide Cards

I got to try a new card technique, and it was fun!  It was also a lot of work- whew!  I did these for a card swap with the PBS Swappers Paper Crafts Yahoo Group, and I think I'm glad there were only 4 of us signed up for this one...these were way more time consuming that I expected they would be.  I'm really glad I tried them out though- I love learning new things!

The swap is for either slide, pop-up, or iris fold cards.  I contemplated doing a simple pop-up, since I kind of put off doing my cards and started to run out of time.  But when I watched this video on the double slide cards, I really wanted to try it.  I think I did ok on these, though there are definitely some things I would do differently next time.  For one, I would leave more time to work on them!  I enjoyed making different designs for these, rather than making the same design for everyone in the swap, like I usually do.  I hope everyone likes what they get from me!

This was the first one I did.  I used some of my favorite colors on this one.


This one, I think, is my favorite.  Love these colors as well, and I really love the butterfly pull for the slides!


I used some nice, high-end paper that I've been itching to use on this one.  Love the aqua and brown combination!  You might recognize this paper from a bookmark I posted before.

That's all I have this week.  What- Mother's Day is coming up this weekend??  Yeah...I figured that out just a bit late!  I guess since Easter was so late this year, I just wasn't thinking about Mother's Day, and it kind of snuck up on me.  I would love nothing more than to make handmade cards for my mom and step-mom, but at this point, I will be lucky if I can buy a card and get it in the mail on time!  Next year, I promise!

Monday, April 25, 2011

Kitchen Creation: Freeform Apple Tart

I mentioned this tart in my last post, in talking about our Easter dinner, and this is what we had for dessert.  It is so easy, it's unbelievable!  I came up with this based on several different recipes I looked at for an easy apple tart.  There are lots out there that are similar, but this is what works best for me. This is actually the second time I made this- previously, I made one half this size using just one pie crust.  We had a few people over for dessert yesterday, so I made the large size.  If you want the smaller size, just halve all the ingredient amounts.

Ingredients:
  • 1 box of 2 refrigerated pie crusts (you can make your own too, but it's easier to use the ones in the box)
  • 4 large Granny Smith apples
  • 1/2 cup sugar
  • 1.5 tsp cinnamon
  • 3 tbsp. or so of apple jelly
  • 4 tbsp cold butter, cut into small chunks (not pictured)
  • 1-2 tbsp water
1. Preheat oven to 400 degrees.  Line a baking sheet with parchment paper.  Unroll one pie crust and lay on the parchment, then unroll the second one and place it overlapping the first one (see picture below)
2. Roll the overlapping sections of crust so that it is the same thickness as the non-overlapping crust.  Roll the edges up and crimp to form a rectangular crust.  Refrigerate until you are ready to layer the apples on the crust.

3. Quarter the apples and cut out their cores.
4.  Peel apples and place in a bowl with cold water and a couple tbsp. of lemon juice to prevent browning.
4. Blot dry and slice apples thinly crosswise.  Discard the small end pieces.

5. Place apples in an overlapping column the long ways down the center of the crust.
6.  Repeat this process on either side of the center column, for a total of five columns.
7.  Place sugar and cinnamon in a small bowl and mix thoroughly.  Sprinkle over the apples, then dot with butter.
8.  Bake for 45 minutes to 1 hour, until the edges of the crust are golden brown and the apple filling is bubbly.  Turn off oven and remove tart.

9.  In a small bowl, combine apple jelly and water and whisk until smooth.  With a pastry brush, brush jelly mixture over the apple filling and crust.


10.  Place tart back into the hot oven for 10 minutes.  Remove and let cool 5 minutes before cutting.  Serve immediately or at room temperature.  Or eat leftovers cold for breakfast the next morning.  It's great with vanilla ice cream!

This is such an easy dessert to put together!  Yes, it takes a bit of work to peel and slice the apples, but it is SO worth it!  Try it for your next holiday meal or when company is coming.  This is the kind of dessert that EVERYONE loves!

Sunday, April 24, 2011

Bookmark Swap

Hello all, and Happy Easter!  We are having a low-key holiday today.  The kids got their goodie baskets this morning, hubby is working, and I'm making a nice dinner, but nothing too extravigant.  I'm roasting a chicken, and we'll have mashed potatoes, veggies, salad and bread.  I'm making a super easy freeform apple tart for dessert- it is so dang easy, you wouldn't believe it!  Maybe I'll snap some photos later while I'm making it, and post it as a Kitchen Creation, which I haven't done in quite awhile now.

Anyway, not too much new craft-wise this week. I didn't have time to do anything new, but I did get a picture of one of the bookmarks I made for the spring theme bookmark swap at the PBS Swappers Yahoo group.  The theme is spring, and what is more springy than flowers?!  I knew I wanted to do something with pressed flowers, that much was for sure.  So on my last trip to Craft Warehouse, I found a really pretty paper that put me in mind of spring.  Its vibrant aqua-blue background reminds me of the clear blue sky, and the bright yellow is so sunny and cheerful, just like a bright spring day!  Here is what I did with it:


I sent off my swap bookmarks the other day, but made one extra, and I'm trying to decide if I want to list it in my Etsy shop or not.  I just might want to keep it for myself!  Like I don't have enough bookmarks as it is, lol!

Speaking of my Etsy shop, things have been pretty slow over there.  I've had items in several treasuries over the last couple of weeks, since I started listing my new designs, and that's nice.  I'm having a sale for Mother's Day- 20% off entire purchase- but so far no takers.  So, I'll tell you what: if you are a follower of my blog and want to place an order by April 30th, I will throw in an extra gift with your Mother's Day order, free!  Just send me a convo or email after you place your order and mention the free gift offer on my blog, and I will include a surprise with your order.  To get your 20% discount, use the coupon code MOTHERSDAY2011 at checkout.

That's all for now- I'll try to come back later and post pictures and a recipe for the incredibly easy apple tart.  Assuming, that is, I can get any pictures of it before my family gobbles it up!

Saturday, April 16, 2011

Baby Card and a Few Bookmarks

I'm still not finding a lot of time for crafting, but managed to do a couple of things this week.  First is a baby card.  This is for a friend of my husband whose wife is expecting their first baby- a boy!  She's due in the next month or so, and there's a baby shower coming up.  I bought a gift, and figured I'd make a card.  Now, this card might look a bit familiar.  It's very similar in style to the one I made for my brother a few months ago.  I did not set out to make this one close to the same, but when I shopped for paper for this card, there were surprisingly few options for baby boy paper at Michael's.  They recently reorganized their paper section, and unfortunately seem to be carrying less than they did before. :(  So that cute paper with the little storks that I used for my brother's card?  I ended up getting that same paper in blue instead of pink.  I did not want to do pastels, so I found a nice dark, almost denim blue to use as an accent, and a nice bright green as well.

The "Baby Boy" on the front, as well as the message on the inside, was printed from the computer.  I like how this turned out, especially because I was able to find an adorable gift bag in these same colors for the gift!

Next up is a few bookmarks.  I ended up having to stay home with my daughter one day this week when she was sick, so I took advantage of the block of time and tried out some new designs.  My Etsy store stock is getting a bit depleted, so I need to restock with some fresh styles, especially now that Mother's Day is only a month away!  I'll be listing these, as well as a few others that I'm not posting here, to my shop soon, so stop by and check them out!  Here's a sample though.
I got these rose buds awhile back, but hadn't had a chance to do anything with them.  They're cute, aren't they?  I used a deep red outer border with an antique gold middle layer, which I think compliments the red, as well as brings out the leaf and stem colors.

I love this one!  This is a new-to-me flower, a carnation.  I got a small package of these to try out, and now I know I need to get some more!  Such a nice bright purple color!  This striped paper is neat too, with various shades and hues of greens and purples.

This one is made with a paper that I've had for awhile and have always liked.  I love the combination of the brown and aqua shades.  The outer border on this one is a deep shimmery brown, with a gold middle layer.  Love these colors together!

That's all for now!  Next time, I'll post a picture of the bookmark I made for the spring bookmark swap at the PBS Swappers group.  I've also joined a card swap for this month, but am awaiting swap details from our lovely hostess Christy.  All I know at this point is that it should be a card with either a pop-up, slide, or iris-fold technique.  I've never done any of those, so it's a fun opportunity to try something new!