Saturday, October 16, 2010

Kitchen Creations- A New Feature on My Blog

I started this blog with the intent of using it as a record of my crafting, but I don't know how interesting all of that is for other people to read.  (Assuming anyone actually DOES read my blog...)  So I thought I might mix things up a bit by adding a feature called Kitchen Creations.  In addition to crafting, I also love to cook, and have been doing that a lot longer than I have been crafting.  I love reading cookbooks, I subscribe to tons of cooking magazines, and I love to experiment in the kitchen!  With this feature, I plan to occasionally share recipes, tips, or cooking adventures in the hopes that my creations in the kitchen will be useful and/or interesting to read.

For my first Kitchen Creations post, in honor of the crisp fall weather, I'm going to share a delicious and healthy soup recipe.  Soups are one of my favorite things to make.  One of the very first recipes I ever came up with on my own was a soup recipe.  It was a cream of broccoli with cheddar that was inspired by a soup I'd tried at a restaurant and just HAD to have again (and again, and again!)  My BFF Kendra will remember it from our college days, as it was a favorite during the cold seasons when we were rooming together.  Now that I'm older, I try to stick to healthier soups, although I do make that broccoli and cheddar soup a couple of times a year for old times' sake.  Soups are great to make at home, because they are so much better than anything you can get out of a can.  They are warm and satisfying, and you can make a big batch that will last several days.  I usually make a big pot of soup every Sunday from fall through spring, and even occasionally in the summer too.  It's great to bring to work for lunch, and if I need something quick for dinner, it heats up in minutes in the microwave.  If you've never tried making soup at home from scratch, consider giving it a try- it's really quite easy!  One warning though- you may become a soup snob and be unable to eat canned soup ever again!

So, on to the recipe: Roasted Vegetable Soup, otherwise known as "clean out your vegetable crisper" soup.  What's really great about this soup is that there are very few rules here- you can use just about any vegetables that you have on hand.  I've made this soup several times now, and each time it's different, depending on what I have in my fridge.  This recipe comes from my online friend Dina, who saw someone make a version of this on a TV show, and she shared it on the internet board where we are both members.  Several other board members have tried it as well, and every single person who has tried it has come back to rave about it!  Let's get started.

Ingredients:


Fresh vegetables- whatever you have on hand.  I used carrots, celery, broccoli, cauliflower, tomatoes, yellow bell pepper, zuchini, 1/2 of an apple, 1 parsnip, 1 onion, 1 russet potato,  and a few cloves of garlic.
Olive oil
Chicken broth (you could also use vegetable broth, though I prefer chicken)
Salt and pepper to taste
Herbs for garnish (optional)

For this version, I also added a drained and rinsed can of garbanzo beans.

Directions:
1.Preheat oven to 400 degrees.  Prepare vegetables for roasting- peel, cut, chop as necessary into relatively uniform bite-size pieces.  For tomatoes, slice in half and squeeze the seeds out before chopping.

2. Put chopped vegetables onto a rimmed baking sheet in one layer.  Use two baking sheets if necessary, like I did:


(It's times like these that I LOVELOVELOVE my double oven!)

3. Drizzle with olive oil and toss to coat.  I just use my hands- it's faster- but you can use a wooden spoon or spatula.

4. Put pans into the preheated oven(s) and roast for 20-30 minutes.  If you notice the veggies beginning to brown, stir with a spatula.  Roast until veggies are slightly browned and mostly tender.  Vegetables cook at different rates, so some vegetables might not be cooked through yet.  That is OK.  Remove from oven(s).


5. Dump all of your veggies into a large pot.  Scrape as much of the roasted bits off of the pans- these are full of flavor!
 
 6.  Add broth.  The amount of broth you need will depend on the amount of veggies you have.  Add enough to cover the veggies by about 2 inches.  You can always add more later if necessary.  For mine, I ended up using two 32-ounce cartons of chicken broth.


7.  Turn the burner on high and bring to a boil, then reduce heat to a simmer.  Simmer for 15-20 minutes, until all vegetables are cooked through and are tender when tested with a fork.  Test your root veggies, such as carrots, as they take the longest to cook.

8.  Puree the soup.  You can do this in batches using a food processor or blender, however, I use an immersion blender.


 I cannot tell you how much I love my immersion blender.  If you don't have one, get one!  Christmas is coming, so start dropping hints now!

Puree the soup until it is nice and smooth.  It may look a bit like baby food.  That's what my husband says it looks like, but don't worry- it tastes much better than baby food.  Add additional liquids at this stage if necessary.


 9.  Add salt and pepper to taste.  Simmer about 10 minutes more, and it's ready to serve!


 I garnished mine with some chopped chives from my garden.  My friend Dina recommends swirling in a little goat cheese right before serving.  I have not tried this yet, but since there are very few things on the planet more delicious than goat cheese, I'm going to say that this is a really good suggestion!

Now, a few notes about this soup.  Through the combined experiences of the gals in my internet group, we have determined a few absolutes about making this soup.  One is to always add some apple.  Why?  Don't know, but it's just not the same without it.  It adds depth and complexity and a touch of sweetness to the flavor.  Two, always add some tomato.  I used fresh tomatoes (the last from my garden), but canned tomatoes can be used as well.  If you use canned tomatoes, do not add them to the roasting pan, as that will create too much liquid and the veggies will steam rather than roast.  Just add the canned tomatoes in when you add the broth.  Three, fresh herbs are wonderful in this soup!  I added mine as a garnish, but you can certainly add some before the pureeing step.  Thyme, tarragon, a little rosemary, dill, anything you have around would be lovely.  You could also use dried herbs, although with those, be careful when adding, because dried herbs are much more potent than fresh, and it's easy to overdo them.

I mentioned that I added garbanzo beans to the soup, and I really loved the results.  The beans, when pureed, help make the texture nice and creamy.  Including a potato does as well, so if you don't like the idea of adding beans, just make sure you put in a potato or two.  The garbanzos contribute a complex nutty, earthy undertone to the flavor of the soup, without having an overwhelming bean flavor.  Plus, they are SO healthy- loads of fiber and protein.  Try it- even if you're not a fan of beans.  You won't even know that they're in there!

The possibilities are endless with this soup, limited only by what veggies you have available.  It's a great way to use up veggies in your crisper drawer that are nearing their expiration date and that you might otherwise throw away.  If your carrots or celery are a little limp, it won't matter!

I hope you have enjoyed this feature, and I look forward to doing more Kitchen Creations features in the future!  I would love your feedback, so please feel free to leave me a comment.  I'd especially like to hear from you if you try this recipe- please tell me how you liked it!  Also, I'm happy to answer questions if anything in the recipe is unclear.

I'll be posting again soon with some more leaf projects, and I haven't forgotten about the giveaway I promised either, so be sure to check back!

Tuesday, October 12, 2010

Tutorial: How to Press Fall Leaves Using Your Microwave

Since it's fall, and since I have been spotlighting some stuff I've made with dried, pressed fall leaves, I thought I would share some tips with you for doing this at home yourself.  There are lots of different ways of pressing leaves, but the microwave is the most expedient of them.  I have mentioned before that I have a Microfleur that I use for drying/pressing leaves and flowers, and it is a great product.  But what if you don't want to spend the money for a specialized product?  There is another way, and that's what I am going to show you today.  I will admit that I love my Microfleur, but you can get very similar results by using things that you probably have sitting around in your house right now.

First, let's talk a little bit about the Microfleur and it's components, and what about it makes it work.  First, it is microwave-safe- that is an important one!  The outer plates are made of a material that does not overheat in the microwave, so anything that you use as a substitute should be microwave-safe.  Even some items that are deemed microwave safe still get very hot when heated in the microwave, so you will need to be very careful through the process.  Next, there is padding, to absorb moisture that is released from whatever you are pressing.  The Microfleur padding is basically a very thick (about 1/2 inch) felt, and there are two.  Then there are cotton fabric liners, which are what your flowers or leaves come in direct contact with.  Finally, there are two clips that hold the entire sandwich contraption tightly together.  That is pretty much it, besides the microwave itself.

So, let me tell you how you can achieve the same or at least very similar results that you get with a Microfleur by using common kitchen items.  The main things we need to keep in mind here are 1)sufficient padding to absorb moisture, and 2) pressure, to press the flowers or leaves completely flat.  There are plenty of options- you just have to look around your kitchen, and you can probably find something that works.  I conducted a test in my own kitchen, and here is what I came up with:


Clockwise from the top left, we have a microwave-safe cooking tray, a microwave-safe casserole dish, paper towels, a rubber band (the kind that comes with the newspaper), a leaf, and a cotton-blend dinner napkin.  You could use a tea towel too.  I would not recommend a fuzzy terrycloth-type towel, however- it will impress the texture into the leaf.  You want to use something with a pretty smooth texture.

Before you begin, check your leaves to make sure there is no dirt or other debris clinging to them.  Wipe off any excess moisture with a paper towel.

First, fold two sets of two paper towels into quarters (in other words, put two paper towels together.  Fold in half, then fold in half again.)  Place on the microwave-safe cooking tray.


Next, take your dinner napkin or towel and fold it until it will fit onto your folded paper towels.  Leave it so that you can fold it one more time, once you get your leaves on it.  Add your leaves, making sure that they do not overlap.


Fold the napkin over to cover the leaves, then place your other set of folded paper towels on top.  You should have a sort of sandwich on the cooking tray: paper towels, towel and leaf, more paper towels.


Now, place your casserole dish on top of the top layer of paper towels.  Be sure to center it on the area where the leaves are inside the towel.  Stretch a rubber band over the whole thing, strapping the casserole dish snugly onto the microwave cooking tray.  This is important for keeping your leaves nice and flat as they are pressed and dried.


Place the contraption into your microwave, and set the timer.


Now, this is where it gets a bit tricky.  The timing is going to depend on your microwave wattage, so you will need to experiment to find out what works best.  Start with short amounts of time until you see what your microwave can handle.  Trust me, you don't want to do it for too long:


I recommend starting with 15 to 20 seconds.  Once you get to know how quickly your microwave cooks, you can try increasing the times.  After the first cooking cycle, remove and check your leaves.  If necessary, put it back in for another 15-20 seconds.  Repeat until your leaves are completely dried.  The best way to judge is to check the stems, as they are the thickest part of the leaves, and will therefore dry the slowest.  As your leaves get closer to being completely dried, you might need to reduce your time to 10-15 second intervals.  Once you can break a small piece off the end of the stems, they are done!


Doesn't really look a lot different than it did before it was dried, does it?  That's the best kind of leaf!

Remember that different leaves will require different processing times, so some might be done before others.  I recommend spreading the leaves out into one layer and leaving them overnight, just to make sure than any excess moisture can evaporate.  Then store them in an airtight container until you are ready to use for your craft projects.  Dried leaves are very brittle, so handle with care!

This method works for green leaves, as well as flowers, too!  Again, cooking times and intervals will vary with the variety of leaf or flower, so experiment carefully to find what works.

Now, I am just an amateur crafter and by no means a professional, so be sure to read your microwave's instruction manual before you try anything like this. Also, be sure that any materials you use in the microwave are microwave-safe, and use pot holders or a towel when removing hot items from the microwave.  Safety first!


Hope you enjoyed my first tutorial!  I'm happy to answer questions- just post a comment if you have any.

I'm still working on a fall giveaway, so check back for that soon!


Sunday, October 10, 2010

Baby Card #2 and Some New Shop Stuff

Babies, babies, everywhere- at least that's what it seems like!  In addition to my brother expecting a new baby, my daughter's best friend is also expecting a new baby sister.  Her mom is due in November, so Meredith and I thought we'd get her a little gift for the baby.  I decided to support one of my fellow Etsy sellers, so that is where I went in search of a baby gift for little Teddie Renee.  I remembered seeing some adorable crocheted hats before, so that is what I went looking for.  Oh my, but there are a lot of crocheted hat sellers!  The one I ultimately settled on was the Portland Beanie Company.  Her work is beautiful, her feedback fantastic, and she's local, too!  Here is the gorgeous little hat that we got:


Isn't that just too cute?!  Almost makes me want to have another baby, just so I can get one of these hats.  JUST KIDDING!  Seriously, they come in all sizes from infant to adult, so maybe I'll just have to get one for my daughter.  Christmas is coming up, after all!

So of course I made a card, too:


I used the same basic design for this one that I did for Kendra's birthday card, and again used that cute stork paper.  I can't wait to give it to our friend!

I've been working a little bit on those new fridge magnets, and actually got a couple of sets of them listed on my Etsy shop.  I have a few more to list, and will be doing that this next week.  It is nice to start getting my inventory stocked up, especially with some new products!

More to come later- I have some fun things I am working on.  One is a tutorial of sorts, and another is a giveaway I'm thinking of doing- so be sure to check back soon!

Monday, October 4, 2010

Birthday Card, Fall Bookmarks, and More to Come!

First and foremost...drumroll...I have my computer back!  Hooray!!

I mentioned in my last post that I had another card to share and that I wanted it to get to its recipient before I posted it.  Well, surprisingly, that card only took 48 hours to get from Oregon to Arizona!  I made this card for my BFF Kendra, whose birthday is this week.  Happy Birthday, Kendra!


Let me tell you a bit about this card.  First of all, the layout came from a sketch that I got from the MojoMonday blog.  This is such a neat blog!  And ironically, it was Kendra who gave me the link to it a week or two ago when I was lamenting the lack of inspiration for my brother's baby card.  There are so many great ideas there, I know I will be making use of a lot of them in the future!  The floral paper in the background is some Japanese washi paper that I fell in love with awhile back and bought without having any idea what I'd do with it.  So when I needed some inspiration for Kendra's card and I came across it, I knew it was perfect for the occasion.  I like how it came out.  The only thing I'd do differently if I could is the "Happy Birthday" message.  With my computer out of commission, printing something was not an option, so I had to hand-write it myself.  This was lots of fun to make, and it's so much easier when I have a sketch to follow!

Now, on to the fall bookmarks.  I have a couple of new ones to share:


And now that I have a functional computer at home, I was FINALLY able to get some listed in my Etsy shop!  Woohoo- it finally looks like fall in there!

I am also working on some new products that I am excited about.  I have wanted for a long time to expand to include items other than bookmarks in my shop.  I am still working on some decoupaged frames and such- and of course, those darned coasters that I still haven't done anything with.  I think I might try some leaves on those though, now that I am seeing how nicely the bookmarks are turning out.  So that's on the horizon.  In the short term, though, I have a new line that fits in pretty well with the bookmarks already in my shop.  Here's a sneak peek:

Aren't these cool little fridge magnets?  I got this idea when I was browsing through Michael's and saw these strips of self-sticking magnets that are like rolls of tape that you can cut to the length that you want.  I have made a few sets of these, and really like how they came out, so will be working on getting these photographed and listed in the shop as well.  The photos I took this evening didn't turn out very well because there wasn't enough daylight, and the lights in my kitchen are not a good substitute.  I'll share my other designs once I've gotten better photos.

So that's all for now- not bad for an average Monday, at least for me!

Saturday, October 2, 2010

Baby Card

I am so excited.  I have a new neice on the way!  Like, really really soon!  She is due sometime in the next couple of weeks, I think.  I can't remember what my brother told me the due date is.  But it's soon, so of course I had to send a present.  And a card!


Ok, I have to say that the colors are not really right in this picture, at least not that I can see.  I'm still using my son's little 9.5 inch laptop, since our home computer is STILL out of commission.  But anyway, I found this adorable paper at Michaels that has the storks bringing little bundles of joy and just loved it, so had to do something with it!  I embossed the green paper with a Cuttlebug embossing folder on my Big Shot, and also cut the card from a Sizzix die that came in the card-making package I got with my Big Shot.  I have been agonizing over making a baby card for my brother for about a week now, and am happy with what I came up with.  Now I can send the present on to Texas, and hope it gets there before the baby does!

I am still collecting leaves and will be making more fall leaf bookmarks in the next few days, and hope to get some listed in my Etsy shop soon!  I also have another card that I will share with you, but not until it gets to its recipient in the mail- don't want to spoil any surprises!

Thursday, September 30, 2010

Fall Challenge Card

Well, the bad news is that our new computer is STILL dead- looks like a defective motherboard now.  Worse, they are on backorder, so there is no replacement to be had at this point in time.  So I don't know when I will have my computer back and working. :(  The good, or if not good, at least luke-warm, news is that I did figure out how to get photos onto my son's mini-laptop that we've been using for email and whatnot, so I can take some basic pictures- I just can't edit them.  So I am still unable to do anything with pictures for my Etsy shop....but I can still put them up here!

The weekly challenge this week at PBS Swappers is to make a card with a gift card pocket or holder of some kind.  Well, I cheated a little bit.  I kind of used that same concept, but applied it to a bookmark, rather than a gift card.  It's something I've been wanting to try for some time anyway, and since I have a brand spaking new bookmark to show off, what a great opportunity to give it a try!


I had a lot of fun picking colors and paper for this card!  You'll recognize the bookmark from my last post, and as you can see, I used the one with the copper border.  These leaves have such a great mix of colors, from green to a goldy-brown to the deep red, and I tried to bring them all out in this card.  The design is pretty simple- just strips of paper adhered horizontally to the card base.  I made my own picture corners with matching paper to hold the bookmark to the card  It held up ok for the picture, but later the corners kept coming loose.  I guess my double-sided tape is not strong enough to hold them down when the bookmark is in them, so I will have to find a stronger adhesive for future projects of this kind.  The letters that spell out "FALL" are just alphabet stickers in metallic gold, which I stuck to rectangles I cut out of off-white card stock with rounded corners, and backed with coordinating borders that I made out of the same paper as on the card.

I will be working on some more fall leaf bookmarks this weekend, and am excited to do so because I have collected and pressed/dried some more leaves, different kinds than the ones above, and can't wait to create with them!  The leaves are starting to change color really quickly now, so opportunities for new material are multiplying daily!  I'm especially on the lookout for yellow and oranges, since what I have so far are in the red/burgandy family.  Hmmm, might be that a trip to the park is on the agenda for the weekend!

Thursday, September 23, 2010

Something Special in the Works!

Well, the bad news first.  Still no computer at home.  It looks like a problem with the video card, so a new one is on order and I'm hoping it will be fixed early next week.  So I am posting this from my work computer- shhhhhh, don't tell on me!  Well, I AM entitled to breaks.  So today, I am foregoing my morning cup of green tea in favor of sharing something special with you.

First, let me refer you to this post- my very first post on this blog.  This is where I shared what inspired me first to begin making my bookmarks.  It was  not quite a year ago now.   In some ways I can't believe it has been that long, and in others, it seems like forever ago!  Anyway, this has been a special week for me because I finally was able to see my original vision become concrete.


I am so excited to use my own dried, pressed fall leaves!  I have been scoping out trees in my neighborhood and near my office and watching for them to start turning colors and falling so that I can start collecting them for my crafting projects.  These particular leaves came from a tree in my neighborhood, and I have to come clean here.  I couldn't wait for them to fall off of the tree.  I've been looking at that tree several times a week, every time I take the dog out for a walk, and the leaves keep getting more and more vividly colored- but the darned things are hanging on for dear life!  So, apologies to whoever my neighbor is who owns this tree, but yes, I took them right off the tree.  Honest, there were lots left.  You wouldn't even know any were gone.  I don't think they'll miss them.  I still feel just a little guilty.

Anyway, I really like how these came out.  I dried and pressed these with my MicroFleur, which I just love because it is so fast and easy.  I was able to make three bookmarks with what I collected the other night.  I love how the leaves are not quite done changing colors- there are still tinges of green on them, which you can see in the close up.  I look forward to trying some with some nice vivid reds, oranges and yellows, which will probably take another few weeks to find.  And I'll try not to steal them.  Once they're on the sidewalk, they're fair game, right?

Here's one of the other ones.  This one uses a copper metallic border instead of the red:

I'm not sure which I like better.  Both look good with the gold on the inner border.  Unfortunately I only have a little bit of that copper paper left and don't know where to find more of it.  But, hey- no better excuse to go shopping for more paper, and I'm not complaining about that!

I plan to get at least one of these listed in my Etsy shop whenever I have a functional computer at home, which I hope will be soon.  In the meantime, I'm still looking for leaves so that I can build up my inventory.  Stay tuned for more additions!

Monday, September 20, 2010

Sigh...MORE Computer Problems

Well, we have DEFINITELY had more than our share of computer issues lately!  After all those virus problems a couple of months ago, we finally got a new computer at home.  We've had it for close to a month now, and it had been working just great...then it suddenly started spontaneously rebooting itself.  My husband has taken it up to his cousin, the computer whiz, to have it looked at, so once again, I am without a computer at home for who knows how long. :(  Well, maybe now I'll have more time for crafting, since I won't be on the internet!  The bad part is that I won't be able to do anything with photos, either for this blog or for my Etsy shop, until we get the computer back.

And what terrible timing that is too, because all of a sudden, activity seems to be picking up on my  Etsy shop!  I'm not sure what's going on, but whatever it is, I'm grateful for it!  I got THREE orders last Friday, and have had my shop items included in two treasuries since Saturday!  I am itching to make some new stuff and get some new listings up, but alas, that will have to wait.

In the meantime, I wanted to share the card front that I made for the first swap I participated in on the PBS  Swappers Paper Crafts Yahoo group.  This swap was for congratulations card fronts.  Since I am new to card making, I was not really sure where to start for this one.  I went to Craft Warehouse to get some supplies and inspiration, and really only had one thing in mind: to make a card that could be given to either a man or a woman.  Since most of the crafting I do is pretty feminine, this was my way of challenging myself and trying to get out of my box, so to speak.  I had some red and off-white houndstooth paper at home that I thought might be nice, so with that in mind, I looked for coordinating papers.  This is the final product:

I fell in love with the tan paisley-patterned paper that serves as the background for this, and thought that the pattern is large enough that it was not necessarily feminine.  As you can see, I did find a way to use that houndstooth paper, as well as some of the red handmade paper, which I tore on the edges to distress it and make it more interesting.  The "Congratulations" text came from a stamp that I picked up from the $1 bin at Michaels.  While it might not be my favorite card that I've ever made, I do like all the different textures used on this one.

I am going to try to get back into the weekly challenges on the PBS Swappers group, starting with this week's challenge to make a card with polka dots- how fun!!  I have several papers with polka dots, plus a polka dot embossing folder that I can use with my Big Shot, so it will be neat to figure out what to do this time!  Hopefully by the time the challenge is over I will have my computer back and can post a picture!

Sunday, September 12, 2010

Big Shot Fun!

Well, slowly but surely, I am getting back into crafting a bit.  I still have very little time, but I've managed to do a couple of things in the last couple of weeks.  Just wanted to do a quick share, since it's been a busy day, and tomorrow is Monday (oh no!), and it's almost 8:30pm, and I still have a whole bunch of things to do before bed!

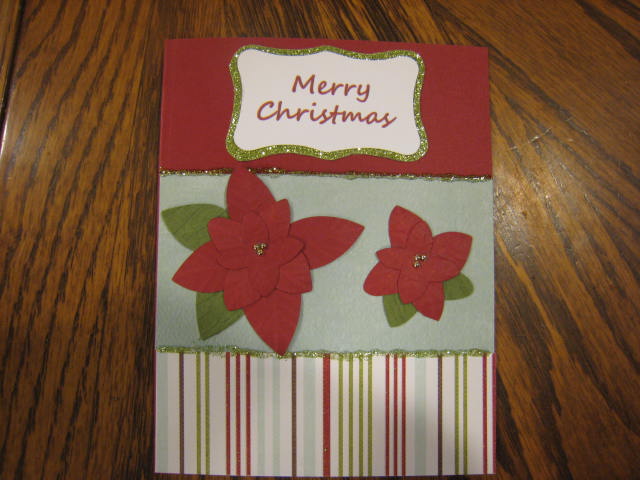
First is the Christmas card I did for the Christmas card swap with my PBS paper crafting swap group.  I wanted to do something with poinsettias, and I found some really cool papers a few weeks ago that I wanted to use.  I got a Sizzix die that I really liked and that I thought would work for poinsettias, and OH, it is SO much easier than making those poinsettias that I was doing before!  This is not a traditional holiday color palette that I used here, but I like that- I kind of wanted to do something a little different.
 I used the striped paper on the bottom as the color inspiration for this, and I think it works really well.  The poinsettias were cut out using my Sizzix Big Shot and the Sizzix Originals Flower Layers #2 dies.  I used the same die to cut out the leaves in green, and cut in half and adhered underneath.  The paper I used for the leaves was a sort of crepe, crinkled texture, that I think gives a lot of dimension.  Now, the poinsettias didn't look quite right, because they were so flat.  If you remember the poinsettias I did a couple of months ago, I used the same embossing technique with an embossing tool on these to give them some veining as I did on those previous ones, and it looks much better than it did with just the flat paper.


Next up is a special project- invitations to my sweet daughter's birthday party!  She will be 10 this coming Wednesday, the 15th, and honestly, I have no idea where the time has gone!  We are having her party next weekend, and thought it would be fun to make the invitations ourselves.  I used another couple Sizzix dies that I got from the wonderful world of the Sizzix clearance center, and Meredith and I are both very happy with the results.

We had a lot of fun with this!  We didn't have a lot of time, or I probably would have tried some additional embellishments.  I love the cupcake though- so cute!

That's all for now- hopefully when things settle down a bit, I can do a bit more creating.  I need to get back to my bookmarks!

Thursday, September 9, 2010

Back From a Break

Hello all!  Not sure how many of you actually READ this blog, but I am sorry for my absence!  My finger is much better, but I have been VERY busy lately with preparing and dealing with the start of school for my two kids.  The oldest (14) is a freshman in high school and is in the marching band, so had band camp for the last two weeks of summer.  Marching band, I am learning, requires a LOT of commitment, not only from the students, but also from the parents!  Honestly, I had no idea...I never did such things in high school myself.  I was too busy obsessing over Duran Duran and trying to keep my hair as big as possible!

Anyway, I have not been doing much in the way of crafting in these last weeks.  My lovely new Big Shot has mostly sat in the living room, lonely, with only the occasional experimental use.  I did check out the Sizzix website and went NUTS over their clearance center- oh what a happy place that is!!  I ordered some lovely items and hope to use them in the near future.  But not til things settle down a bit.  Right now, I'm lucky I have time to sleep, let alone craft!

I have not even been able to keep up with the wonderful Yahoo paper crafts group that I belong to- I have not participated in a weekly challenge in a few weeks because of lack of time.  However, I did join a Christmas card swap, so have done a little work on my design for a Christmas card for that.  I am hoping to get my cards done this weekend and mailed out, since the deadline is next week.  I am not usually one to wait until the last minute, but as hectic as things have been, I must forgive myself this time!


The leaves are are beginning to change colors here in the Northwest, and I am getting excited, because that means FALL LEAVES!  I cannot wait to try some bookmarks with some beautiful fall-colored leaves!  I have already scoped out some trees in my neighborhood and near work so that I can score some of those leaves that I envisioned last fall in a bookmark.  Stay tuned to see the results of that, because I am determined to make it a reality!

Well, that's all for now- I'm hoping to get back in the swing of things soon.  Will definitely post pictures of my Christmas cards- I think they will be nice, though not in traditional Christmas colors.