Whew, it's been such a busy time the last couple of weeks! School starts for my two kiddos next Wednesday (the 7th) so we've had all kinds of things going on in preparation. My son (10th grade) had 2 weeks of marching band camp, my daughter had her summer dance recital at the state fair last Saturday, and both of them have been trying to cram in as much fun time with their friends in these last few days of vacation.
While I haven't done a lot of crafting, I have been doing some behind-the-scenes stuff...organizing supplies, trying to decide on what to do for a fall card for the swap I am hosting at the PBS Swappers Paper Crafting group. I had to do some maintenance on my Etsy shop, since they changed to relevancy search (which, by the way, I think is fantastic)- my titles and tags needed editing, and with almost 50 items in my shop, it took me awhile to get it all done. Next, I really need to redo a lot of my photos, because they changed the photo resolution awhile back, and now all my pictures look awful- close-ups are blurry, and the colors are all off. So that is going to be quite a project! I am also planning out what I want to have in my shop for fall and winter, and am thinking about cleaning house and clearing out some of the older bookmark designs. I might just have to have a big clearance sale!
I did get an order this week, and I was excited about it, because it is for a personalized 2-flower bookmark. My customer is a very nice lady named Carol, and she inquired about a pretty envelope for the bookmark. How perfect is that?! I told her I have been experimenting with gift envelopes, and she agreed to be my first live guinea pig! I offered her a gift envelope for no extra charge, since I'm still developing the concept, and asked if it would be OK with her that I post pictures on my blog and possibly use them in the future as example pictures in my shop. She agreed, and I very happily made an envelope to go with the bookmark. I am very happy with how it turned out, and I really hope that Carol likes it too!
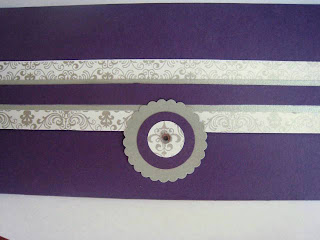
This is the front (or would that be the back?) where it opens:
The seal is similar to the other ones I did, punched with a scalloped circle, then layered with smaller circle punches. The lighting was not great this morning when I shot this picture, but there is a clear jewel in the center, looks like a little sparkly diamond.
Here is the other side:
As you can see, the envelope itself is a deep bluish-purple. I used it along with silver, because those are the colors in the bookmark. I had this pretty silver and white toille patterned paper and thought it would be perfect for this, and I love it! It is layered with a strip of metallic silver paper, then with a strip of purple, which has been punched with a floral border punch, so that the silver shows through.
And here is the bookmark, inside the envelope:
I lined the envelope with white and used a lace corner punch on the corners, which I also used on the front flap of the envelope. Temporary adhesive holds the bookmark in the envelope, and it's nice because it usually does not leave any residue on the back of the bookmark. It wipes off easily if some does remain, though. I used the same temporary adhesive on the seal, so that it is easily opened and resealed.
I'm really happy with this, and I hope Carol likes it! It sure was a lot of fun to come up with the envelope design, and now I am more motivated than ever to offer this option in my shop.
Hopefully next time I will have a fall card design to share, as that will be my next project. Also, my daughter's birthday is coming up later this month, and I think we will take a few of her friends from dance class out for ice cream at Dairy Queen after their Saturday class. So I'm thinking of making up some little invitations to hand out for that. We're not doing a big birthday party at home this year, but I know she will enjoy ice cream with her friends, and she will like helping design and make the invitations too.


No comments:
Post a Comment